

My last article was about the value of a good interceptor pilot and the comments I got made me want to write another article to help pilots master this role. So in this article we will be looking at Tackle Interceptor Fittings and Tactics.
What you will quickly notice is that all of the fittings are very similar in Tank and Function. ALL use Medium Shield Extenders for a Shield Buffer tank.
The reason I use the MSE instead of an active tank is because it's simpler (requires less pilot attention) and because your capacitor cannot support a active tank (except for a ASB). An ASB would be a viable option on some of the ships, however my need for longevity and simplicity make it unattractive.
Next you will notice that the weapons on these ships are close range, and unable to apply damage to a target at your optimal orbit range of 18-25km. The reason for this is because your weapons are secondary to everything else on your ship.
In the past I flew my Tackle Interceptors without any weapons at all, and for awhile even made that the standard fitting for my Alliance. The reason for this comes down to Roles. Your Role as a Fleet Tackler is to Tackle ships, not to do damage, EWAR, or anything else. YOU ARE THERE TO TACKLE.
By not having weapons pilots are able to focus more on their Role and not be temped to try to be a DPS ship and risk dying to apply a measly 70-100 DPS.
Later, I decided to fit weapons as a Drone deterrent, since Drones are often your biggest challenge. However, in most cases weapons are only mildly effective against Drones anyway due to the way Drones charge up close shoot you, then back away out of gun range. This requires a level a micro management that can take your focus off of more important tasks like controlling range, keeping up your Situational Awareness, and communicating with your FC and Fleet.
The point is that Guns are optional and optimal. You will be able to do more with Guns, but they also require you to manage more in the heat of battle. As a new pilot you may want to avoid them and instead use that Powergrid and CPU to boost speed, agility, or Tank. The choice is up to each individual pilot.
The Way Of The Tackler:
- Master your Directional Scanner. Search this site for guides on how to do use it, then go out in high sec and practice it until you are very good at it. To do this go to a highsec system and pick one ship on scan, then use Dscan to find him. If you can't find him, get your Angle down to 5 Degrees, uncheck "Use Overview Settings," and see where he is. If you see a moon and POS Structures, he's at a POS. If you see only him, he's at a Safe. If you see wrecks from rats, he's missioning or running a site.
- Learn to pilot your ship well using your Orbit, Keep At Range, and by Manually Piloting. You will only have to manually pilot some times, but when you do it can make a big difference to quickly control direction.
- Set your Orbit to 18km and then Adjust it throughout the fight as needed. If the target is bouncing out of point range, then shorten your orbit range. If he is trying to kill you with drones, consider increasing your orbit range to increase your speed and orbit radius so Drones hurt you less (but watch your point and don't let it drop). If you are taking damage from an enemies Turrets, either disengage or tighten your orbit. On Cruisers and Battlecruisers with very good tracking you can avoid DPS by tightening your orbit to around 15km. The closer you are to the target the harder it will be for him to track you with guns, however if you get within 13km you become vulnerable to neuts and webs. Based on the target and situation you can sometimes orbit at 500m (against a Tornado for example).
- Set your Keep at Range to 100km or even 1000km. This is your "Oh Shit" button. Keep at will move you directly away from what ever you have selected in the quickest way possible. It is much better than manually attempting to guess at the correct direction to run in. I often use this when I see a Anti-Tackle ship charging me. I will click him on Overview then click Keep at range 100km and THEN before I get to 100km I will manually pilot to reengage, change to a diagonal flight path (avoid longer range guns), or whatever else I want to do.
- If you are flying a Dual Point Interceptor, become proficient at doing "Drive By Scrams." To do this you first get in a stable orbit, then manually fly just close enough for an overloaded Scambler cycle. Land your scram, then IMMEDIATELY get back and reestablish your orbit. Done right the enemy doesn't even see you do it or have a chance to counter with a overloaded web. Many times they just sit there with MWD off believing it is still running and not realizing how your fleet got on top of them. This is a very helpful tactic, get good at it.
- Use your fast warp speed and bubble immunity to scout surrounding systems. If your fleet already has a primary scout to check the next system, you should be very quickly covering as much ground as possible and checking systems near your fleet for targets, or danger.
- Communicate with your FC and Fleet. Speak in as few words as possible and convey all the information that is important to the situation. Typically this would be something like "8 in system, Gate Clear, Dscan Clear" or "System Clear" or "Enemy Fleet on the other side, ship types..." or whatever other information is important. Don't waste the FCs time with unimportant information like "The sun in here is red" or "there's a lot of sites here."
- Call your Points. In any fleet it's important that to know who is pointed and who isn't. If a ten man Fleet all points the Primary and nine of the enemies ten man fleet warp away, you just messed up big time. Instead call your points by saying something like "Point Rodrigo in Hurricane". As the Fleet Tackler, you must be aware of who is pointed and avoid over pointing them with too many people. Once other fleet members have a point on the target you should break off and seek to point something else and hold it until your fleet can kill it.
- If using Dual Point, then consider pointing two ships at once. A good example of this would be me pointing something like an Oracle that's no big threat to me and orbiting it at 5km while using my long point to point something else.
- Look for opportunities to use your points for unconventional reasons. Like perhaps holding a Logi ship on the station undock or gate so it can't warp to it's fleet and assist.
Read those twice and take them to heart, then practice, practice, practice. There is much more to it than you see here, but this will allow you skip months or years of trial and error learning.
And finally here are the fittings:
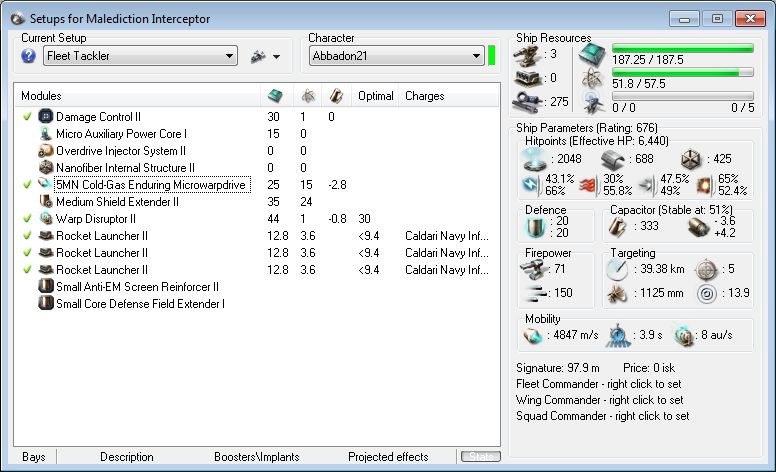
[Malediction, Fleet Tackler]
Damage Control II
Micro Auxiliary Power Core I
Overdrive Injector System II
Nanofiber Internal Structure II
5MN Cold-Gas Enduring Microwarpdrive
Medium Shield Extender II
Warp Disruptor II
Rocket Launcher II, Caldari Navy Inferno Rocket
Rocket Launcher II, Caldari Navy Inferno Rocket
Rocket Launcher II, Caldari Navy Inferno Rocket
Small Anti-EM Screen Reinforcer II
Small Core Defense Field Extender I
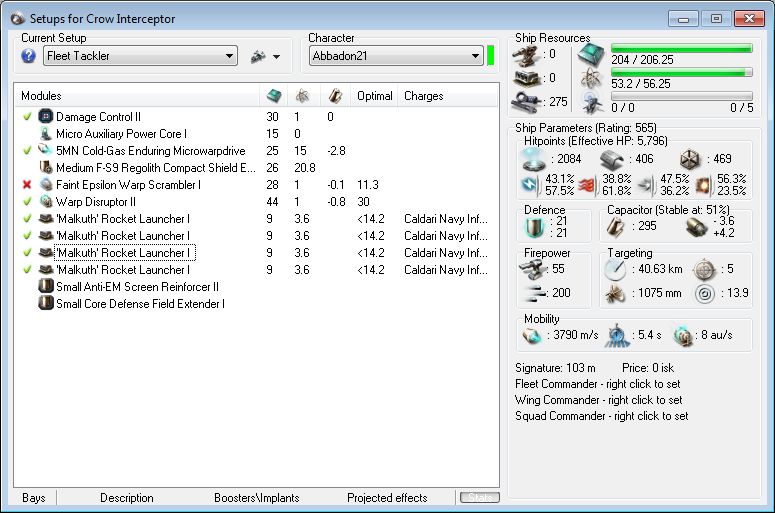
[Crow, Fleet Tackler]
Damage Control II
Micro Auxiliary Power Core I
5MN Cold-Gas Enduring Microwarpdrive
Medium F-S9 Regolith Compact Shield Extender
Faint Epsilon Warp Scrambler I
Warp Disruptor II
'Malkuth' Rocket Launcher I, Caldari Navy Inferno Rocket
'Malkuth' Rocket Launcher I, Caldari Navy Inferno Rocket
'Malkuth' Rocket Launcher I, Caldari Navy Inferno Rocket
'Malkuth' Rocket Launcher I, Caldari Navy Inferno Rocket
Small Anti-EM Screen Reinforcer II
Small Core Defense Field Extender I
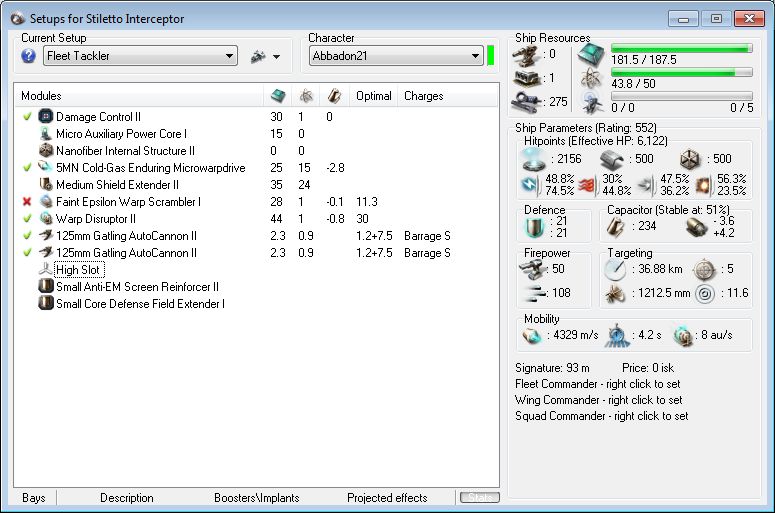
[Stiletto, Fleet Tackler]
Damage Control II
Micro Auxiliary Power Core I
Nanofiber Internal Structure II
5MN Cold-Gas Enduring Microwarpdrive
Medium Shield Extender II
Faint Epsilon Warp Scrambler I
Warp Disruptor II
125mm Gatling AutoCannon II, Barrage S
125mm Gatling AutoCannon II, Barrage S
[empty high slot]
Small Anti-EM Screen Reinforcer II
Small Core Defense Field Extender I
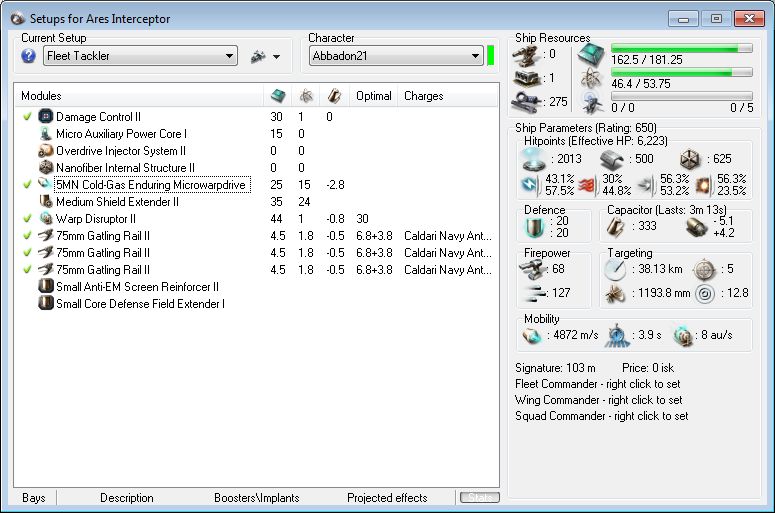
[Ares, Fleet Tackler]
Damage Control II
Micro Auxiliary Power Core I
Overdrive Injector System II
Nanofiber Internal Structure II
5MN Cold-Gas Enduring Microwarpdrive
Medium Shield Extender II
Warp Disruptor II
75mm Gatling Rail II, Caldari Navy Antimatter Charge S
75mm Gatling Rail II, Caldari Navy Antimatter Charge S
75mm Gatling Rail II, Caldari Navy Antimatter Charge S
Small Anti-EM Screen Reinforcer II
Small Core Defense Field Extender I


Recent Comments
No comments to display