

 In this guide I will explain the new kill rights system and how it has changed, there are many new exciting changes in the kill rights system. I will explain the new changes as in depth as I can, so keep reading and hopefully I can make it easy to understand. Kill rights over all have not really changed, the way you get kill rights and the time limits on kill rights are still the same.
The only way a player will now get kill rights on you is if you destroy their ship in high security space and they were not a legal target to you or you destroy a players pod in low security space. Basically it has to be a criminal act, not just a suspect type act. The old kill rights system would allow a player that you had destroyed a ship or pod to have a legal right to attack you in any level of security.
The new kill rights system still allows the player that has kill rights on another player to legally attack them in any security level space. But there are many new features to what you can do with these kill rights, now you can share the kill rights around with other people. I know you are interested now and I am sure most of you have heard or read something regarding these changes.
I hope to make it all clearer in this article, basically you can now control your kill rights much more to benefit or just punish the pilot that you have kill rights on. You can make the kill rights available to all Eve players; you can sell the kill rights for an amount you think the kill rights may be worth. You can make the kill rights available to a specific player or corporation/alliance, the choice is yours.
There are new overview background colours and icons for the new kill rights system, these are disabled by default. This means if you want to see if a player has an active kill right on him, you will need to enable these items in your overview settings. Firstly you need to be in space, then select your overview settings and select Appearance. Now you can enable the orange crosshair icon for kill rights in the color tag section. Then select Background and activate the orange kill right background color. You will now see people who have kill rights available for you to activate in your overview without needing to select them, I also hope this means they will have an icon beside their name in local chat.
In the past the only way you could tell if you had kill rights was to actually open your character sheet and look in your kill rights tab and then memorize them all. Now as explained above there are new icons and background colours in the overview settings, this will make it much easier then before. But you must activate these icons etc, as they are disabled by default.
Let’s get started on the actual menus and the new way you can control your kill rights, there are some new options that you can select when looking at your kill rights. But let’s look at how you make it possible for you and others to attack the kill right party. If you have kill rights on another player it is very simple to make it possible for you and all other Eve players to be able to engage them. But here is one of the major downfalls to the way the kill rights are activated, after a lot of testing the only way I have found you can activate the kill right is if the player is in your overview.
You can then activate the kill right, in the image below you can see the selected player and the arrow pointing to the kill right icon in the top right corner.
Image 1

It is very important to note that with the old kill rights, you could just attack a player that you had kill rights on freely. This is no longer the case; you must activate the kill right before you can engage the player you have kill rights against. This is simple to do, but is very important you activate the kill right or you could end up with a Criminal or Suspect Timer if you engage the player without activating the kill right.
To activate the kill right select the player you have kill rights against in your overview, as shown in Image 1 above. Now click on the kill right icon shown in the top right corner of image 1 with the arrow pointing to it... This will show the activation options, the options are shown in image 2 below.
Image 2

In image 2 above you will see it has text and an Activate button, the text will show you additional information. This includes activation cost etc.; we will discuss the costs at a later stage. But right now if you clicked the Activate button, as shown in Image 2 above with the arrow pointing at it.
The kill right will be activated and the person you have kill rights on will receive a Suspect Timer. Yes that’s right a Suspect Timer, this means the person you have activated the kill rights on is a target for ALL Eve players. When you activate the kill right, the player that you are activating it on will here an audible alarm to tell them they have received a Suspect Timer.
Now let’s move on to the additional options you now have with kill rights, there are three new options for kill rights. So assuming you have some kill rights on a player, open your character sheet and then click on the Kill Rights tab. Now you will notice the new option button, as seen in image 3 below with the arrow pointing to the options button.
Image 3
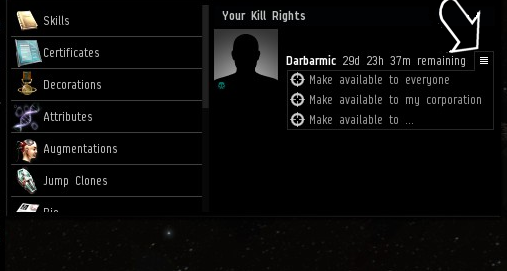
You will also notice the three options in the above image; these will only appear after you press the options button. The three options are “Make Available to Everyone”, “Make Available to My Corporation” and “Make Available To”. Option one is self explanatory “Make Available to Everyone”, Option two “Make Available to My Corporation” is also self explanatory.
Now once you click the option you want to use, you will then get another window with additional options. This is shown in Image 4 which is below; this is where you can set the kill right activation cost. The amount you set in this window is the price other players will pay every time they activate the kill right.
Image 4

As you will see in Image 4 above I have selected to make the kill right available to everyone, below the “Everyone” text in the image above is where you enter the activation cost. Let’s say we entered 1 Million ISK as the activation cost, this means every time any player activates this kill right you will be paid 1 Million ISK. Now if a player activates the kill right and nobody kills the target in the 15 minute Suspect Timer, the kill right will still be available for people to activate again. This means you could be paid many times over for the same kill right, with this in mind you should make the price a fair one.
So once you enter the price for activating the kill right click on the “Make Available Button” shown in Image 4 above with the arrow pointing to the Make Available Button. Now once you have activated a kill right with the option you want, you can change your mind and cancel it at any time. Simply open your character sheet and go to the Kill Rights tab and find the player in the list of active kill rights. Now press the option button on the kill right you want to change, shown in Image 5 below. When you click the option button you will get a new option to select, as shown in Image 5 below. As you can see the only option is Make Unavailable.
Image 5

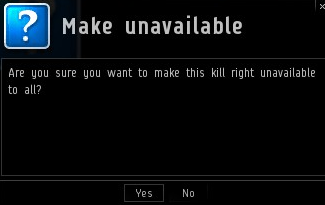
Once you click on “Make Unavailable” you will be presented a question box. as shown in Image 6 below. Simply choose “Yes” or “No” in the question box to finalize your choice to make the kill right unavailable. You can then select new options for the kill right you just made unavailable.
Image 6
Now for the “Make Available To” option, this option allows you to select a specific entity to access the kill right. When you select the Make Available To option you will be presented with a new window, as shown in Image 7 below. This window allows you to search for Players, Corporations and Alliances, this will be who you want to have access to the kill right.
Image 7
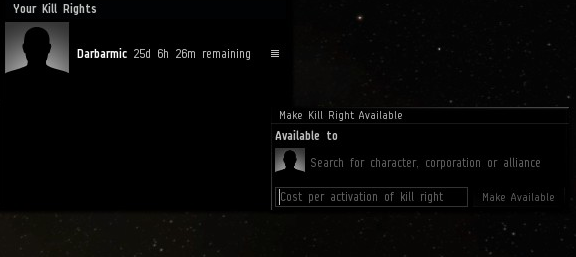
As shown in the image above, simply type into the Search for player, corporation box the name of the player, corporation or alliance you want to allow access to this kill right. Then press your enter key, if there is only one entity with the name you have typed it will be automatically added. If there is more then one entity with a similar name to what you entered you will get a new window.
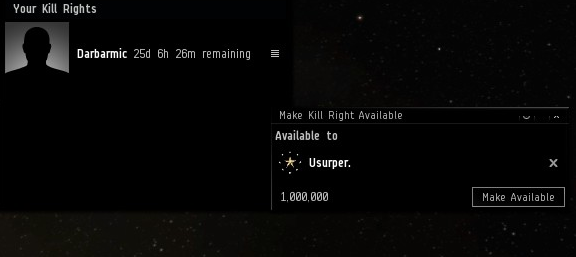
In the new window simply go through the selections and locate the entity you want to give access to and select them. Now as shown in Image 8 below this is what your window will look like with an entity selected and a value entered into the activation cost box. Once you have entered all the details simply click on the Make Available button.
Image 8
You can easily tell who kill rights are available to, simply open your Character Sheet and click on the Kill Rights tab. The kill rights will show you the name of the player, how long is remaining on the kill right and then below the name will show who the kill right is available to. If you have not made the kill right available, there will be nothing below the characters name.
Now even if you make the kill right only available to you and one other player this only stops other players activating the kill right. This would mean only you and the player you made the kill right available to could activate the kill right. However as soon as you or the other player activate the kill right, this will make the player that you activated the kill right on a suspect.
This means the player will be a valid target for everyone, not just the person who activated the kill right. Also you may want to be careful making the kill right available to everyone, if you do and it is free to activate the person you have the kill rights on may use an alt to activate the kill right. Then when the kill right is active he will kill the player with his alt and his player will be in a noob ship or shuttle, this would make for a disappointing result for you.
Another important note for people attacking the person who has had the kill right activated on his character. The person will be a suspect and can be engaged by all Eve players, but unless he is in null security or low security he cannot attack anyone without getting additional timers. But as soon as you engage him he can attack you back.
This is because you get the Limited Engagement Timer, as soon as you engage him, read the Crime Watch – Timers Guide to learn more about how the new timers work. Basically make sure you understand all the new timers before you go suspect hunting. I hope this guide helps people understand the new kill rights better.


Great Article, I look forward to these changes…
I didn’t expect the kill rights to remain valid until the target was killed. I expected them to expire after a single activation. That’s very cool, guaranteed kill per kill right.
Can I still see who has kill rights on me in my Character Sheet?
Just so people are not confused, the kill right is available for 30 days from receiving it and will not expire until 30 days or the person is killed whilst the kill right is active. But remember when you activate a kill right it is only active for 15 minutes at a time.
Yes you can still see all your active kill rights under your character sheeet. This is people who you can kill and people who can kill you.
So, by the time you activate the kill rights they have either warped away or maybe even blown your ship to bits… That is not going to work well..
A system for how to best use them will have to be learned, but with planning you should be able to find people with kill rights and use them to an advantage.
I am not real happy with the way it works iether, but as usual with Eve we work with what we have 🙂
Wow, that sounds nice, to share the kill right.
Abb, I am trying to recover my password and user name, but I am getting error. I am thinking to come back to game
Good to hear from you Splinter. I hope you can get access to your accounts again, let me know if I can help.
Honestly I don’t like the system. So now I kill somebody in nullsec, the person gets mad, puts 1 isk price on the bounty and now everyone can gank me in hisec? Seems almost inevitable you would die within the month to them.
Also say you have 3 killrights on you and you die once, are all the kill rights fulfilled or do you have to die 3 times before they all go away?
Hi Bow-wow,
Sorry that I did not explain it well enough, but I am sure you can only have one kill right on a person at any one time. So you will not get multiple kill rights from one person, if someone successfully destroys your ship whilst the kill right is active, that kill right is gone and you would have to do a similar act to the player after this for them to get a kill right on you again.
Please do not confuse players being able to put a price on kill rights with the bounty system. I am currently working on the new bounty system article. But let me tell you the bounty system is the same as it was, you cannot kill a player in high sec just because they have a bounty. They still need to be a legal target, pirate, war target, suspect etc. The only real change to bounties is how you get paid, as you no longer need to kill the pod to get the bounty, stay tuned for the article.
this gave me some inspiration…. i wanna put a bunch of cans out in highsec for people to rob from me, then id place a 1 million bounty on them and a 1 million killright activation on them for all to have. i can only imagine after getting enough kill rights i would start to see my wallet grow.
Is there any way to see the kill rights that are made available to one by others, as in, a befriended char shares his kill right with my corp — or can we see those only in the overview (rather by conicidence)??
DevBlog from november states “you just need to remember whom to look out for as it is not as clearly shown as for war” is this still valid? No way to tell other than keeping an eye on overview?
You can turn on the killrights overview icon in the overview settings. It is explained somewhere in the article. When you turn the killright icon on it will show on charcters in the overview and in any chat channels, like local etc. It appears as a skull like the suspect icon etc. I am just not sure of the colour, but that is also mentioned in the article.
So i have been podded a couple times, and there is nothing in the kill rights section about anything i can do about those people podding me. So i am able to have kill rights activated on me, but i am not able set them up on anything..
If you shoot back at them during the fight you do not get kill rights. At least I’m pretty sure that’s how it works.
The only way you get killrights on another pilot is if they committed a criminal act, the only two real acts are if they pod you in high sec for no reason and same if they pod you in low sec. There are many factors that can change this, if you are at war, if you have any sort of aggression timer with the other pilot. So as Abbadon says, if a pilot was shooting at you and you shot at him, this would give you the multiple aggression timers. This would include the blue or teal mutual timer, if this one is in your timers even after your ship is destroyed you need to hide or dock until it is gone or that pilot can pod you with no killrights being activated
Well said Mic
So here’s a weird question that I cannot find an answer to.
We needed to clear CONCORD from a belt because “reasons”.
So I shot at a POCO owned by another corp with a rookie ship to draw them over.
CONCORD left the belt and came to murder my face, and I gained a new killright against me owned by the corporation that owns the POCO.
My friend is the CEO of that corp, but has no option to make it public or activate it.
What’s that about?
I’m not sure, but since the kill right is owned by the corp he may have to activate it in the Corp Window.